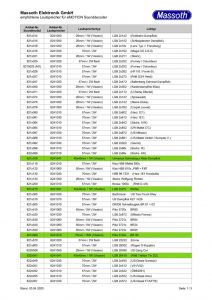
Wiki is online again
Most WIKI entries can now be found directly on massoth.de/wiki. The conversion reports from the Locomotives section will be transferred in the near future.
This Episode of MASSOTH TV shows the RhB 205 (LGB 2045) fitted with the 8440022 Drives for scissor pantographs in full action.
Here we describe the installation of the decoupler in a PIKO “Harzkamel”. With some skill you do not need to remove the gearbox or bogie. I did this only in the course of a gearbox inspection. First unscrew the original hook and then remove the snow plow. As shown in figs. 1 and 2, you have to cut away something on the bogie (about 2-3mm). So that the decoupler…
Our customer Mr. Tobias Zahn kindly sent us some pictures and hints for his conversion of his 21950. Here his notes: After first tests on my layout, I have heard a crack when the loco goes in and out of a R1 LGB radius. On closer inspection, it is noticeable that the new clutch remains attached to the bridge of the footboard at the front of the locomotive. This…
At the Kö / Köf type locomotive locomotive has already been designed very generously in the area of clutch engagement. On both sides of the locomotive, only a small opening must be cut into the rear wall of the clutch mount. Now the automatic decoupler can be installed both front and rear. Here are the changes for installation in a shunting locomotive Kö / Köf 2x93x Milling for decoupler…
The automatic decouplers are also suitable for the C’C-Mallet from the LGB program. Small adjustments are necessary at the front and rear. At the front, the extension of the gear box must be separated in the area of the decoupler. This work can be carried out without hesitation, since this is not the actual locomotive transmission. At the rear, the plastic web is also refined in the middle so…
The installation of the automatic decoupler into an IV / K locomotive is more complex. At the front, the mounting base of the snow plow is exactly in the pull-in field of the decoupler drive. First dismantle the entire stem of the front bogie. The mounting base is completely removed and the snow plow is divided into two components. Also, the small ridge is removed in the middle between…
For the HSB five-couplers you have to make massive changes to the forerun / follower. How this looks we show here: Milling at the forerunner / follower Fully assembled uncoupler
The steam locomotive 99 6001, or ballerina, can be modified relatively easily for the automatic decoupler. The forerunner and the follower are identical, so the adjustments are identical in the front and rear. In each case, a small plastic triangle is removed in front of the axle mount. It is important to keep about 0.5 cm of plastic in front of the axle, otherwise the axle will not find…
On the basic model of the Spreewald-Lokomotive it is necessary at the front as well as rear small rework on the rail clearing and the leading axle. At the rear, the snow plow is separated in the region of the decoupler into two components. The middle cut-out plastic piece is no longer required. The two snow plow halves on the right and left side are now mounted with the…
Here the changes for the installation in a Wismarer rail bus 2x65x Milled coupling holder Fully assembled decoupler
In this model, both the front and rear gearboxes are in the way. Vorne verfügt die Lok über einen relativ großen Getriebehalter. Dieser wird im Bereich des Entkupplerantriebes um gut 3 mm ausgefräst. The front part of the gearbox is also cut out in the middle section. The rear gearbox is completely cut off in the area of the automatic decoupler. Again, a small incision has to be made…
The decoupling unit can be mounted with moderate modifications to the Ge 2/4. Adaptations are necessary on the identical forerunner and follower. The small plastic triangle between axle and coupler mount must be removed completely. Subsequently, a wheel tire is drawn from the axis so that the axis can be separated from the plastic-molded part. Now the axle bearing can be split in the center on the clutch side,…
The Ge 4/4 II of LGB has to be adapted for the automatic decoupler only slightly. On both bogies, 15 mm must be cut off from the double plastic web. The automatic decoupler ensures safe operation. Here the changes for installation in a Ge 4/4 II 2x43x Milled coupling holder Fully assembled decoupler
The model of the Ge 4/4 III of the Rhaetian Railway has extensive modification for mounting the automatic decoupler. After the LGB coupling and the snow plow have been dismantled, the fastening thread for the snow plow screw is removed completely at the drawbar. Now, the central web is separated in the snowplow tip and in the region of the former fixing screw, the component is also cut out…
The automatic decoupler is also intended for the Rhaetian crocodile. In the crocodile, besides minor adjustments to the snow plow, it is primarily necessary to carry out subsequent work on the gearbox. The small noes-piece on the snow plow has to be removed so that the coupling hook can move freely downwards. In the case of gearboxes, the front web is first cut out in the gearbox. Then the…
With the Bernina rail car of the RhB, only a few small adjustments on the drawbar as well as on the snow plow are necessary for the assembly of the decoupler. The traction unit has an identical bogie at the front and at the rear, so the rework must be carried out on both sides. The snow plow cut is broadened to 1.6 cm. Thus, the hook of the…
Here the changes for installation in an electric locomotive BR 101 2x31x
On the G 3/4 steam locomotive of the Rhaetian Railway, the automatic uncoupler can be mounted both rear and front. At the rear, the decoupling unit can be mounted directly on the model without modifications. Small adjustments are necessary at the front axle. The plastic cover of the leading axle is completely removed in the center so that the axle is exposed on the front. In addition, the plastic…
At the Stainz, both front and rear adaptations are necessary. We recommend disassembling the gearbox as both sides must be adapted. First of all, the middle web of the through-going cylinder component is first cut out. In the next step, the front part of the gearbox is separated from the gearbox and cut out in the middle. In doing so, the latching lug, which was previously locked in the…